Posts

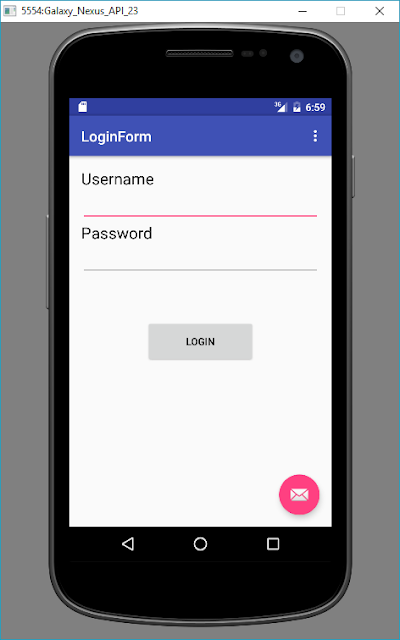
Create A Login Form Using Android Studio(Just Gui...Without Database)
Image
Create Login Form Using Android Studio 1.Open Android Studio... 2.Firstly,Design a Login Layout... 3.Which should be like this... 4.Now Lets Create a New Activity which will be displayed after hitting the login button..... As per my tutorial I have provided...login_layout.xml as my xml file and Login_Display.java as my java file for the new activity... If You Don't know how to create new Activity go to my following tutorial... Create A New Activity..    5.Now Lets...Work with MainActivity.java file... 6.The login_layout.xml file which is your new layoutfile will be as such... here,take a large text after welcome and by double clicking create a new resource string provide appropriate name and say ok..if you don't know things are explained in previous tutorial on the above given link 7.Finally,lets work with new activity.java file which the Login_Display.java file... 8.Now Lets Run the Application on Emulator and its working... ...

Implement Progress Bar Using Android Studio

Image
Steps To Design Progress Bar Using Android Studio 1. Open Android Studio 2.Drag a Button and Provide appropriate name and id for the Button Xml file for Button Design... 3.Now,Lets work with MainActivity.java file....refer the following code... 4.That's It....You Are Done!!..... If You are New or Don't Know How To Run App On Emulator Go to My Following Link... Run App On Emulator.. Thank You...!!!

Design Analog and Digital Clock Using Android Studio

Image
  Implement Analog and Digital Clock Using Android Studio 1.In this Tutorial,By Hitting the Button We are going to swap the clock type... Step 1: Open Android Studio... Step 2:Create New Project... Step 3: a.Drag Analog Clock and Digital Clock from date and time as shown below... b.Drag a button....Provide appropriate id,name and OnClick property for the button by accessing properties... Step 4: Now Lets Work with MainActivity.java file..... Refer the following code.. Step 5: Now Lets Run the App and Test on Emulator...    Its Working...!!   If You are New or Don't Know How To Run App On Emulator Go to My Following Link... Run App On Emulator.. Thank you...!!!

Simple Steps To Create And Link An New Activity

Image
Create An New Activity Using Android Studio 1.Start Android Studio.. 2.Now,Lets Understand How To create an New Activity....For that we will Need to create..   a.New Layout File...ie. XML file  b.New Java Class...ie. Java File.. 3.Lets Start.... Firstly, Make New layout file ie. Your Xml file Go to res...Double click on Layout->New->XML->Layout Xml File.... as shown... 4.Name the Layout File with appropriate name and say finish.... (Provide in small case letters...)                                              5.Your New activity XML file has been created..which should be something like this.... 6.Now....Lets Create the Java File.... Double click on MainActivity->New->Java Class... Select Java Class.. 7.Provide Appropriate name to the Java File... 8.Your Java file must be something like this... ...

Design a Simple Calculator Application Using Android Studio....(Part 2-Calculator Implementation )

Image
Build a Simple Calculator Performing Arithematic Operations Using Android Studio.....    In The Previous Tutorial We Have Designed The layout Of Calculator...In This Tutorial We Will Be Working On The Implementation Part ie. With The MainActivity.java file If You are New to the tutorial go through Following Link For Calculator Design Layout Calculator Layout Design   Lets start... 1.The Layout Of Our Project Looks Something Like This... Make Sure The Layout Has Four Buttons and Each Button with "onClick" property has been given some value or name. (Recommended to Provide a Single Name For All Buttons to Avoid Confusion Ahead)... 2.Now Open the "MainActivity.java" file...Which Shall Be Something like this.. 3.Create a Method...which should be something like this...             public void <OnClickname>()       {               //Implement Your Logic h...

Design a Simple Calculator Application Using Android Studio....(Part 1-Design Calcualator Layout)

Image
Build a Simple Calculator Layout Using Android Studio.....   1.Open Android Studio 2.Create New Project.... 3.Provide Appropriate Name and Select The Android Version as per your Requirement... 4. If You Are New To Android Studio Or Don't Know How To Create New Project...Go To The Following Link..... Create New Project Using Android Studio.... 5.Lets Start...Firstly, Change the Layout Of Your Design From "RelativeLayout" To  "LinearLayout"....Also Provide "android:orientation:vertical" for vertical layout Of Device....As Shown .... 5.Now Lets Design The Calculator Layout.... Step 1: Drag "Plain Text View" from widgets and drop on Device..... Double-Tap On the text view and Provide text name as "Enter First Number" and also provide a text_id as "Num1"...  (you can provide anything as per your requirement)... Also you can design text_name by accessing Prope...

Build Your Android Application APK File Using Android Studio

Image
Generate Your Android Application Apk File  1.Open Your Project In Android Studio From Which You Want to Generate Your APK File  As Shown Below I Have Created a Simple "Hello World" Project..... If You wish to create the same "Hello World" Project In Android Studio Project Go Through My Links Given Below.... Create "Hello World" Project Using Android Studio 2.Now, Hover Cursor on "Gradle" which is at Left-Corner as shown.... (Don't Click...The Options Won't Display)                                        3.Select "Build Variants" from the List.... 4.After selecting "Build Variants"....As You Can See Below The App Is In "Debug" mode... 5.Here, In Order To Generate APK File You Need To Select the "release" mode...  Because, When You Are Testing Your Application It must be in "Debug" mode But If You Wish To Generate APK file Its...