Create A Login Form Using Android Studio(Just Gui...Without Database)

Create Login Form Using Android Studio


1.Open Android Studio...

2.Firstly,Design a Login Layout...


<?xml version="1.0" encoding="utf-8"?>
<RelativeLayout xmlns:android="http://schemas.android.com/apk/res/android"
xmlns:app="http://schemas.android.com/apk/res-auto"
xmlns:tools="http://schemas.android.com/tools"
android:layout_width="match_parent"
android:layout_height="match_parent"
android:paddingBottom="@dimen/activity_vertical_margin"
android:paddingLeft="@dimen/activity_horizontal_margin"
android:paddingRight="@dimen/activity_horizontal_margin"
android:paddingTop="@dimen/activity_vertical_margin"
app:layout_behavior="@string/appbar_scrolling_view_behavior"
tools:context="com.example.siddhi.loginform.MainActivity"
tools:showIn="@layout/activity_main">
<Button
android:layout_width="150dp"
android:layout_height="60dp"
android:text="Login"
android:id="@+id/LoginButton"
android:onClick="OnButtonClick"
android:layout_centerVertical="true"
android:layout_centerHorizontal="true" />
<TextView
android:layout_width="wrap_content"
android:layout_height="wrap_content"
android:textAppearance="?android:attr/textAppearanceLarge"
android:text="Username"
android:id="@+id/textView2"
android:layout_alignParentTop="true"
android:layout_alignParentLeft="true"
android:layout_alignParentStart="true" />
<EditText
android:layout_width="fill_parent"
android:layout_height="wrap_content"
android:id="@+id/Username1"
android:layout_below="@+id/textView2"
android:layout_alignParentLeft="true"
android:layout_alignParentStart="true" />
<TextView
android:layout_width="wrap_content"
android:layout_height="wrap_content"
android:textAppearance="?android:attr/textAppearanceLarge"
android:text="Password"
android:id="@+id/textView3"
android:layout_below="@+id/Username1"
android:layout_alignParentLeft="true"
android:layout_alignParentStart="true" />
<EditText
android:layout_width="fill_parent"
android:layout_height="wrap_content"
android:inputType="textPassword"
android:ems="10"
android:id="@+id/password"
android:layout_below="@+id/textView3"
android:layout_alignRight="@+id/Username1"
android:layout_alignEnd="@+id/Username1" />
</RelativeLayout>
view raw gistfile1.txt hosted with ❤ by GitHub

3.Which should be like this...

4.Now Lets Create a New Activity which will be displayed after hitting the login button.....
As per my tutorial I have provided...login_layout.xml as my xml file and Login_Display.java as my java file for the new activity...

If You Don't know how to create new Activity go to my following tutorial...

Create A New Activity..  

5.Now Lets...Work with MainActivity.java file...
public void OnButtonClick(View v) //OnButtonClick...onclick value of login button
{
if(v.getId() == R.id.LoginButton) //login button name
{
EditText a = (EditText)findViewById(R.id.Username1); //Find the username edittext on new activity.....
String str = a.getText().toString(); //convert to string
Intent intent = new Intent(MainActivity.this,Login_Display.class); //call new activity
intent.putExtra("Username",str); //putextra retrieves the value of string
startActivity(intent); //strat the activity
}
}
view raw gistfile1.txt hosted with ❤ by GitHub

6.The login_layout.xml file which is your new layoutfile will be as such...
here,take a large text after welcome and by double clicking create a new resource string provide appropriate name and say ok..if you don't know things are explained in previous tutorial on the above given link
<?xml version="1.0" encoding="utf-8"?>
<LinearLayout xmlns:android="http://schemas.android.com/apk/res/android"
android:layout_width="match_parent"
android:layout_height="match_parent">
<TextView
android:layout_width="wrap_content"
android:layout_height="wrap_content"
android:textAppearance="?android:attr/textAppearanceLarge"
android:text="Welcome ,"
android:id="@+id/textView" />
<TextView
android:layout_width="wrap_content"
android:layout_height="wrap_content"
android:textAppearance="?android:attr/textAppearanceLarge"
android:id="@+id/Username1"
android:text="@string/emptystring" />
</LinearLayout>
view raw gistfile1.txt hosted with ❤ by GitHub


7.Finally,lets work with new activity.java file which the Login_Display.java file...
public class Login_Display extends Activity {
@Override
protected void onCreate(Bundle savedInstanceState) {
super.onCreate(savedInstanceState);
setContentView(R.layout.login_layout);
String username = getIntent().getStringExtra("Username");
TextView tv =(TextView)findViewById(R.id.Username1);
tv.setText(username);
}
}
view raw gistfile1.txt hosted with ❤ by GitHub


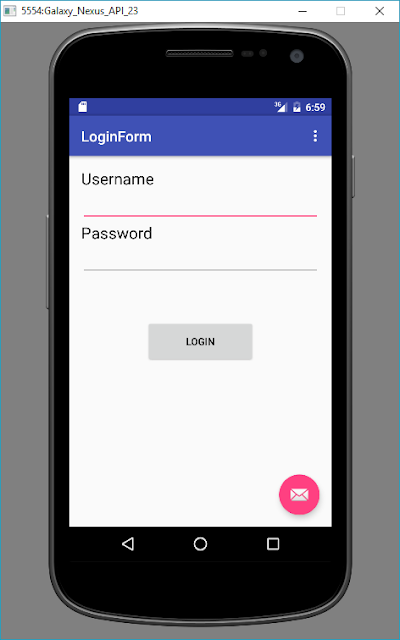
8.Now Lets Run the Application on Emulator and its working...
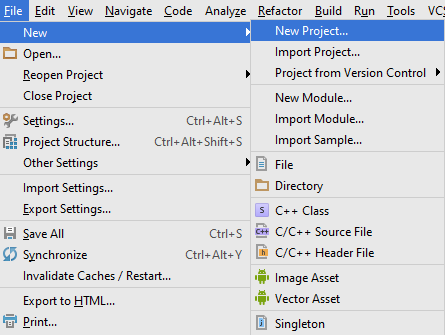


9.If You are New or Don't Know How To Run App On Emulator Go to My Following Link...
Run App On Emulator..

Thank You..!!!

Comments

Popular posts from this blog

Design Analog and Digital Clock Using Android Studio

Design a Simple Calculator Application Using Android Studio....(Part 1-Design Calcualator Layout)

Create Simple "Hello World" Android Application Using Android Studio