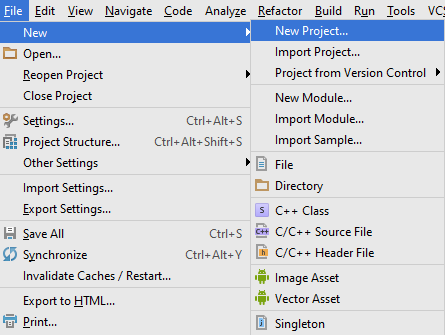
Android Studio Downloading And Installation Steps
Find The Simple Steps To Download & Install Android Studio On Your System!
1.Firstly, Make Sure Your System Meets Following Requirement
- Microsoft Windows 7/8/10 (32-bit or 64-bit)
- 2 GB RAM minimum, 8 GB RAM recommended
- 2 GB of available disk space minimum, 4 GB Recommended (500 MB for IDE + 1.5 GB for Android SDK and emulator system image)
- 1280 x 800 minimum screen resolution
- JDK 8
- GNOME or KDE desktop: Tested on Ubuntu 12.04, Precise Pangolin (64-bit distribution capable of running 32-bit applications)
- 64-bit distribution capable of running 32-bit applications
- GNU C Library (glibc) 2.11 or later
- 2 GB RAM minimum, 8 GB RAM recommended
- 2 GB of available disk space minimum, 4 GB Recommended (500 MB for IDE + 1.5 GB for Android SDK and emulator system image)
- 1280 x 800 minimum screen resolution
- JDK 8
2. Ensure That You Have Jdk(Java Development Kit) Installed On Your Laptop/Computer
3. If Not,
You Can Download And Install By Following Steps Mentioned Below (If JDK Is Already Installed You Can Skip This Steps)
You Can Download And Install By Following Steps Mentioned Below (If JDK Is Already Installed You Can Skip This Steps)
A. Download Jdk On The Below Given Link By Scrolling Latest Version Of Java Se Development Kit.
http://www.oracle.com/technetwork/java/javase/downloads/jdk8-downloads-2133151.html
http://www.oracle.com/technetwork/java/javase/downloads/jdk8-downloads-2133151.html

C. Click On The Download Link Next To Your Operating System
D. Install The Jdk On Your Computer/Laptop
E. Hence, Now You Are Successfully Done With Jdk Installation
4.. Installing Android Studio

Fig-2.Download Android Studio
5. Accept The “Terms And
Conditions” By Scrolling The Content And Click On Download Android Studio For Windows

Fig-3.Accept Android Studio
License
6. Save The File On Desktop.
7. Launch The .exe
Application File On Your Desktop
8. Launched .exe Application
File Will Let You Start The Installation Process. The Installer Will Appear By
Presenting The Android Studio Setup Dialogue Box As Shown Below…..

Fig-4.Android Studio Setup
9. Next Dialogue Box Gives
Certain Components To Install. It Is Suggested To Keep Default Settings And
Click Next……

Fig-5.Install Components
(Keep Default Settings And Click Next)
10. Accept The License
Agreement And Continue Installation….

Fig-6.Licence Agreement
11. Next Dialogue Box
Provides Selecting Installation Location For Android Studio And SDK…. (Suggested To Keep Default Locations And
Continue To Next)

Fig-7.Set Android Studio And
Android Sdk Locations
12. The Next Dialogue Box
Defaults To Create Shortcut On The Desktop Or Doesn’t Create If You Choose To
Decline…. (Suggested To Create Shortcut
And Click “Install”)

Fig-8.Click Install And Continue
Installation
13. The Resulting
Dialogue Box Shows The Progress Of Installing Android Studio And The Android
SDK. Clicking The Show Details Button Will Let You View Detailed Information About
The Installation Progress. The Dialogue Box Will Inform You When Installation
Has Finished. When You Click Next, You Should See The Following Dialogue Box.

Fig-9. Leave The Start Android Studio Checked-Box Checked To Run
Software
14. After Completing
Installation, Click The Android Studio .exe File Created On Your Desktop....
If Not Search For Android
Studio And Run The Application.
Running The Application Will
Display The Following Splash Screen While It Is Running.......

Fig-10. Start Screen
while starting android studio...
15. On Your First Run,
You'll Be Asked To Respond To Several Configuration-Oriented Dialog Boxes. The
First Dialog Box Focuses On Importing Settings From Any Previously Installed
Version Of Android Studio.
If
You're New Or Don't Have A Previously Installed Version, You Can Just Keep The
Default Setting And Click OK

Fig-11. Import or
Default settings
16. Android Studio Will
Respond With A Slightly Enhanced Version Of The Splash Screen, Followed By The
Below Android Studio Setup Wizard Dialog Box

Fig-12.Android Studio Setup Wizard..
17.Clicking Next, The
Setup Wizard Invites You To Select An Installation Type For SDK Components.....(Suggested
To Keep The Default Standard Setting)

Fig.13.Installation Type
18. Click Next And Verify Your
Settings, Then Click Finish To Continue.

Fig-14.Verify Settings.
19. The Wizard Will Download
And Unzip Various Components. By Clicking On Show Details You Can See More
Information About The Archives Being Downloaded With Their Contents.

Fig-15.Download and Unzip Android Studio Components.
20. Finally, Click
Finish To Complete The Wizard. You Should Be Able To See The Below Welcome To
Android Studio Dialog Box

Fig.16.Startup Android Studio Window
21. You Have Successfully
Assembled Android Studio On Your System.
Now The Android Studio Application
Is Ready To Use.......
Thank You..

Comments
Post a Comment